Thursday, May 12, 2011

Final Project: Toy

Creating a toy that had some personal tie to me was initially difficult. My childhood toys were a hammer and nails during the summer and a box of legos during the winter. I spent my time building castles and then finding monsters to either slay them or encourage them to attack the castle. While I was pondering this dilemma, I was brought back to my last project of a gargoyle. I had the research, they fit as monsters of my youth, so I had a subject to use again. Working with metal and tools has always been play time for me, so I incorporated these into my toy.
Collecting the found objects was part rummaging through my own storage closet and part jogging through my neighborhood. I have collected a mass of odd things over the years, unwilling to throw anything away that might come in useful later. Thus the body of my project came from cleaned out garages, hidden junk piles in basements, sheds being demolished and homes being renovated. All of the things were given to me or found by me. Except for the glue and putty, those I had to purchase. The final pieces came from a neighbors recycling, the toy chopper for a head (and later, a box of gold fish for the wings).
My idea for the design was mostly circles and lines. I used round pieces and straight pieces as much as I could. I wanted to emphasis the constructed look, straight lines and perfect circles that aren’t found in nature. The robots of my youth had a little to do with this as well.
My final piece is a collection of robot, gargoyle and tribal warrior. This is defiantly a toy that I would play with as a child (or adult). The name and background story of my robot gargoyle is still in the works but coming soon.

On of my inspiration pieces.
The Body is a mini beer keg that I just couldn't part with.
 The feet are old ceramic light sockets with brass washers and bolts for legs.
The wings are long metal rods held on with metal epoxy putty.
 The initial pieces.
 The arms are wrenches I found bolted and glued together. I added an old hinge to cover an odd placed hole int he body.
 I cut off the front of the toy helicopter to use as a head. I used the rotor for a headdress of sorts. I thought about using them as wings or horns, but I didn't want to separate them.
 My biggest problem child was getting this tail piece from the helicopter to stay on as my gargoyles tail. It just wouldn't stay put.
 Dramatic lighting turns the comic effect down and makes him almost scary.


 My final piece. I added a base in order to keep him more stable. He kept tipping.

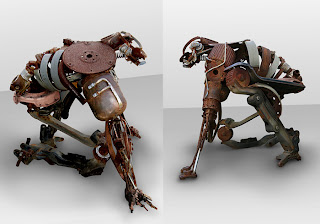
My two gargoyles posing together.
Tuesday, May 3, 2011

Project 3: Polyhedral Structures (Phase B)

With this project I decided to give in to the Gargoyle. I had enough research from the previous projects that I just needed to sketch out a rough idea and then fit in the polyhedrals. After some quick sketches I began with a bristol paper body, which was mostly just a box. I added a wing to see if the size was appropriate. Then I broke out the card-stock and models and started construction.
The second hardest part was deciding what shapes to use. This required me to understand the functions of the pieces and then to take a cubist view of the body parts. I gave the arm sections six sides to make them rounder, I gave the gargoyle squared pecks to pay tribute to impersonate armor of the middle ages. Each body part was created with a polyhedral and then assembled together. The final structure had folded wings to keep the weight down and only the top half of the body because getting the legs to look like a squatting gargoyle didn't work. They kept making it look like a bent frog.
Overall, in order to make this sculpture, I had to get an idea of how the smaller shapes fit together to represent the intended idea.


Sunday, March 20, 2011

Serial Planes Part Two

The Brainstorming Began.

Foam board is the construction material
But that doesn't limit what the central
Idea can be.

 I looked at cylinders and cones.
 I thought about abstract shapes and forms.
 I also began to think about 
some representational pieces and ideas.
 Grass and surfing, snow, rain and fire.
 The sea with fish, a shark and a SCUBA diver
hanging from above was one idea I really liked.
 I briefly toyed with the idea of a castle
but I I wasn't sure about how I would
separate the layers to make it 3-D
AND keep it interesting.


Deciding to do something representational
I looked around for some interesting forms.
The Gargoyle had a lot of appeal. 
 Staring out over the city, they look scary
And fascinating.
 The Rain clouds held appeal as hanging piece.
It provided an opportunity to add in many layers
using simple repetition.
A dead tree held some potential
but even though it held appeal,
I wanted to do something different
from my other projects. 
 This image had some appeal. 
The snowman had some character.
 I really liked the idea presented by this.
The idea of using layers to create a positive image,
Like a bas relief.
But it looks complicated.
 I liked the idea of sculpted shrubbery.
A two -fer, plant and sculpture.
Clouds, water and a sun in the distance.
This is a chance to produce size, depth and scenery.


But with the heavy winter, snow was on my mind.
So I went with a snowman for my model.


Serial Circles.
Arranged to create a ball.
 The tops and bottoms of the lower two sections were flattened slightly
too keep the structure from rolling away.
 The top piece didn't look right, so I left off half to present a flat surface.

I tried it with a face, but it didn't look right. So I left it off.
 The sections were staggered in size like you would expect with a snowman.
The bottom section could've been made a little bigger, but I was keeping with the times and kept him slim.
 Every snowman needs a hat. In order to contrast the rest of the round
pieces, I made the top hat squared off. I left open holes in the top to keep
the structure open.
 Putting the arms on, I used pieces left over from cutting the circles for the body. The points reminded me of sticks. I tried to add some layers to
the arms, maybe add a little depth, but there wasn't enough material to
do it correctly.
The broom took a little work. I tried to make the bristles straight and nice,
but that didn't look good. So I used similar pieces as the arms.
The result was more of a pitchfork than a broom but it worked.


The final assembly has glue and toothpicks keeping the bottom sections
held together. The hat and the head are loose, allowing the snowman
to look in different directions.
The lower sections are arranged the same direction because it didn't look
right to alternate them. They aligned better facing the same way.


The final result is a posed snowman, one arm down and one hand up,
holding the scary broom. The hat is slightly askew, adding just a tiny bit
more attitude to the snowman.

Serial Planes Part One


This is the First Phase of the Serial Planes project: The Altered Book.

The connected planes of this book were changed to produce something different. 

Something Not a book

The Book was de-covered and then cut in half. The two halves will be later joined with one laying mostly flat to allow the pages to open up and the other half standing with the pages opening out.
 The hardest part was laying out the design and then cutting through over 250 pages of paper. This was done to make the shape more organic and include negative space.
 After lots of cutting and some rolling, the standing half of the book began to take shape.
 With some folding and more folding and a little bit of hot glue, the second half of the book expands out.
The Final Product: An arrangement of serial planes that look nothing like the original book.
The two halves have been joined together perpendicular to each other. An added twist was brought about using a small section of illustrated pages. The dark pages offer a contrast to the other mostly white pages.